Eclipse 3.2 Setup unter Ubuntu

Leider ist im Ubuntu Stable (derzeit 8.04.1 Hardy Heron) Repository immer noch nur die Version 3.2 von Eclipse abgelegt. Da ich in letzter Zeit öfters Eclipse auf neuen Maschinen im Geschäft oder Privat auf der genannten Plattform installieren musste, möchte ich die wichtigen Punkte mal rasch für mich notieren. Ziel ist es Eclipse mit Subversion- und PHP-Plugin einzurichten.

Ein gutes Tutorial zur Eclipse-Installation findet sich in der Wiki des Deutschen Ubuntu Forums. Hier die nötigen Schritte für die eigentliche Eclipse Installation:

  1. Über den Paketmanager Deiner Wahl folgende Pakete installieren: eclipse („), eclipse-nls (Sprachpakete), sun-java6-jre (gewisse Plugins machen Zicken mit dem GNU Java), sowie optional auch subversion (falls man mal etwas von Hand im SVN machen muss).
  2. Damit auch Sun Java verwendet wird, muss man noch folgenden Befehl ausführen:
    sudo update-alternatives --config java

    und Sun’s Java auswählen.

  3. Zudem muss man noch in Eclipse die Prioritäten-Liste der Java-Umgebungen aktualisieren, so dass Sun’s Java an erster Stelle steht. Diese Datei hört auf den Namen „/ etc/eclipse/java_home“. Weitere Details dazu finden sich auf der Originalen englischen Ubuntu Wiki.

Die Plugins werden in Eclipse über einen Assistenten installiert der über das Menü „Hilfe > Software-Updates > Suchen und installieren“ gestartet wird. Man muss dort lediglich die unten stehenden URLs eintragen und die gewünschten Funktionen auswählen. Für die beiden Plugins gilt folgendes:

  1. Subversion Synchronisierung nutzen wir über das Subversive Plugin. Für Eclipse 3.2 muss aber eine alte Version (1.1) genutzt werden. Diese findet man über die „alte“ Polarion Webseite, die Plugin-URL lautet „http://www.polarion.org/projects/subversive/download/1.1/update-site/“. Die beiden benötigten Funktionen heissen „SVN Team Provider“ und „SVNKit 1.1.4 Implementation“. Die „Java SVN Implementation“ unterstützt leider nur SVN 1.3. Alle unsere Server (auf Debian Etch) sind aber bereits Version 1.4 und machen mit dem älteren Plugin einige Schwierigkeiten.
    Subversion Synchronisierung nutzen wir über das Subclipse Plugin. Für Eclipse 3.2 muss Version 1.4 genutzt werden. Diese findet man über die Tigris Webseite, die Plugin-URL lautet „http://subclipse.tigris.org/update_1.4.x“. Die benötigten Funktionen heissen „Subclipse – Required“, „Subversion Client Adapter – Required“, „SVNKit Client Adapter“ und „SVNKit Library“.
    Da wir keine Windows-Plattform nutzen müssen wir dem neuen Plugin noch mitteilen, dass es die SVNKit Bibliothek nutzen soll. Dies geschieht über das Menü „Fenster > Benutzervorgaben“ und dort unter „Team > SVN“ im Reiter „SVN Client“. Im Dropdown „SVN Client“ „SVN interface“ muss die oben installierte Bibliothek ausgewählt werden.
  2. Die korrekte Version von PHPeclipse für Eclipse 3.2 ist unter der Plugin-URL „http://update.phpeclipse.net/update/archives“ zu finden. Installiert werden muss nur die Funktion „PHPeclipse“. Die beiden anderen Funktionen stehen für spezielle Webserver mit Debug-Ausgabe. Damit die PHP-„Rechtschreibkorrektur“ (Syntax-Prüfung) funktioniert, sollte man auf dem Entwicklungsrechner ebenfalls PHP installieren.

Und nun viel Spass beim Versionieren und bei der Arbeit in einer professionellen PHP-IDE.

Update vom 15. März 2009:
Aufgrund eines Updates unserer SVN-Server ist das Subversive-Plugin nicht mehr kompatibel mit diesen. Daher mussten wir auf Subclipse umsteigen, von dem noch eine kompatible Version für Eclipse 3.2 existiert. Die Doku wurde entsprechend angepasst.
Manually fixing bug with Darklooks GTK-theme and Compiz

This is annoying: Whenever I install a new GNOME-Desktop with my favourite Darklooks theme from the gnome-theme-extras package (in Ubuntu) I am confronted by this silly bug. As soon as I change to the compiz-window-manager it starts resetting the theme to default colours.Finally found the corresponding bug report. To fix it open the file /usr/share/themes/Darklooks/gtk-2.0/gtkrc and edit it like follows:

clipped from bugs.launchpad.net

You can fix it by changing the two tooltip lines…

from:

181: bg[NORMAL] = @tooltip_bg_color
182: fg[NORMAL] = @tooltip_fg_color

to:

181: bg[NORMAL] = @tooltips_bg_color
182: fg[NORMAL] = @tooltips_fg_color

Installation from USB Stick

The method described below is truly one of the simplest for installing an Ubuntu ISO image on an USB stick.
clipped from ubuntuforums.org

  • use syslinux to make the usb stick bootable (you will need to set the bootable flag too. i think syslinux gives you pointers on how to if it isn’t set, that or use something like fdisk)
  • copy the contents of the ‚isolinux‘ dir on the install iso into the root dir on the usb stick
  • rename isolinux.cfg to syslinux.cfg
  • goto http://archive.ubuntu.com/ubuntu/dis…ages/hd-media/ and download the initrd.gz and vmlinuz files.
  • create a folder on the usb stick called ‚install‘ and copy initrd.gz and vmlinuz into it (or alternatively edit the syslinux.cfg to point it to the correct location of initrd.gz+vmlinuz)
  • copy the ubuntu iso you wish to install onto the root of the usb stick

ISS Orbit Display

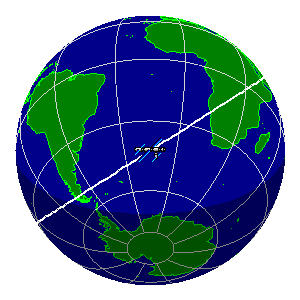
Die Internationale Raumstation über dem SüdatlantikInternationale Raumstation im Juni 2008Auf der Seite Heavens Above kann man sich die aktuelle Position von Satelliten im Orbit ausgeben lassen. Das prominenteste Objekt ist derzeit natürlich die Internationale Raumstation.

Zitat Wikipedia:

Die Pläne für eine große, internationale Raumstation gehen bis in die 1980er Jahre zurück. Die Station war damals noch unter den Namen Freedom oder Alpha in Planung. Die ISS befindet sich seit 1998 im Bau und ist zur Zeit das größte künstliche Objekt im Erdorbit. Sie kreist in ca. 350 km Höhe mit einer Bahnneigung von 51,6° alle 92 min um die Erde und soll nach ihrer geplanten Fertigstellung im Jahre 2011 maximale Abmessungen von etwa 110 m x 90 m x 30 m erreichen. Danach soll sie mindestens bis ins Jahr 2016 weiterbetrieben werden.

GNU screen: select, copy & paste

In this little snip, we learn how to select, copy and paste text betwen screen’s and even files.
clipped from gentoo-wiki.com

Scrolling back in Screen

To enter the scrollback mode press C-a <Esc>. Now, you can scroll up and down in the current terminal using the <PageUp>/<PageDown> keys or the C-u and C-d commands.

Selecting text, copying, pasting

Copying works by selecting a start position and an end position for text to be copied. These are marked with the cursor’s current position by pressing the <Space> key. Between two strokes the buffer can be navigated with the keys <h>, <j>, <k>, <l>, <arrow keys>. And this default behavior can be changed in .screenrc. The content of the buffer can then be pasted back into any other Screen window of the current session by typing C-a ]

Advanced copying

set Screen into copy mode with C-a <Esc>, select the text between two <Space> keystrokes and then set a buffer file in the current directory with C-a :bufferfile notes.txt. This file is written into by C-a >.

GNU screen: Splitting the screen into regions

This time it’s about the how to split the screen and change the size of those regions.
clipped from gentoo-wiki.com
Screen can horizontally split into regions, each holding a different terminal.
To open a new region one types C-a S (capital s, please!).
To enter that newly created region we have to tab into it: C-a <Tab> Still nothing can be seen, but we can now cycle through our open terminals with C-a n or C-a p.
To close a region type C-a X.
A region with focus can be resized with C-a + or C-a - By default this changes the height by 3 lines.
Alternatively, you can specify the height to an absolute number by going into Screens command mode.
Typing C-a : puts Screen into command mode and the status line at the bottom changes.
Screen now accepts direct commands and resize 24 makes the currently focused region exactly 24 lines high.

GNU screen: Basic usage

This article explains some of the basic usage principles of the screen terminal multiplexer.
clipped from gentoo-wiki.com
screen is a moderately complex program that emulates a terminal. The feature it is best known for is the ability to disconnect and reconnect to screen sessions, which very gracefully survive logoffs.
GNU Screen enables you to run many shell processes in a single terminal.
Even better, you can split your terminal into different regions. Only Ratpoison gives you more bang for your bash!
The first sign of Screen successfully running can be discovered by typing C-a " which shows the list of terminals.
At the moment there is only one.
The Esc key exits that window.
Alternatively, use C-a w to list them briefly in the window’s title bar.
A new terminal is created by typing C-a c.
With C-a n for next or C-a p for previous Screen you can cycle through those windows.
To detach Screen one can either use the brute-force method
or the running instance of Screen can be properly detached with C-a d first.
To access this one instance we re-attach with screen -R. Voilà, here we go again!